Rear Brake Disc
Runout Inspection
1. Loosen the rear wheel lug nuts slightly, then raise the car and support on safety stands. Remove the rear wheels.
2. Remove the brake pads (page 19-20).
3. Inspect the disc surface for grooves, cracks, and rust. Clean the disc thoroughly and remove all rust.
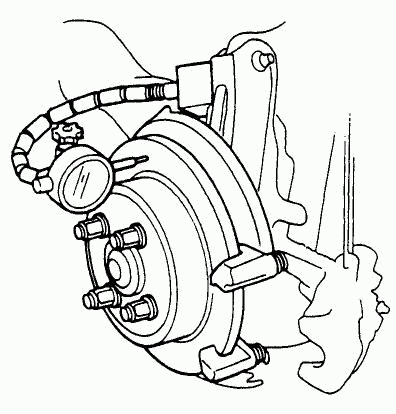
4. Use lug nuts and suitable plain washers to hold the disc securely against the hub, then mount a dial indicator as shown and measure the runout at 10 mm (0.39 in) from the outer edge of the disc.
Brake Disc Runout:
Service Limit: 0.10 mm (0.004 in)
Max. Refinishing Limit: 8 mm (0.32 In)
5. If the disc is beyond the service limit, refinish the rotor.

Thickness and Parallelism Inspection
1. Loosen the rear wheel lug nuts slightly, then raise the car and support on safety stands. Remove the rear wheels.
2. Remove the brake pads (page 19-20).
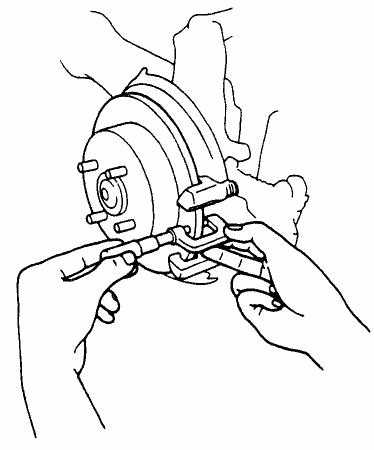
3. Using a micrometer, measure disc thickness at eight points, approximately 45° apart and 10 mm (0.39 in) in from the outer edge of the disc.

NOTE: A new disc should be refinished if its runout is greater than 0.1 mm (0.004 in).
Brake Disc Thickness:
Standard: 9 mm (0.35 in) Max. Refinishing Limit: 8 mm (0.32 in)
Brake Disc Parallelism:
The difference between any thickness measurements should not be more than 0.015 mm (0.0006 in).
4. If the disc is beyond the service limit, for thickness or parallelism, refinish the rotor.
О компании
Каталоги
Каталоги авто
Наши телефоны:
Наши реквизиты:
Политика конфиденциальности
2024, HondaWorld.
Все права защищены
Наши реквизиты:
ООО "ПартсРу"
ИНН 7713747944, КПП 774301001
ОГРН 1127746372401
ИНН 7713747944, КПП 774301001
ОГРН 1127746372401
Политика конфиденциальности
2024, HondaWorld.
Все права защищены


