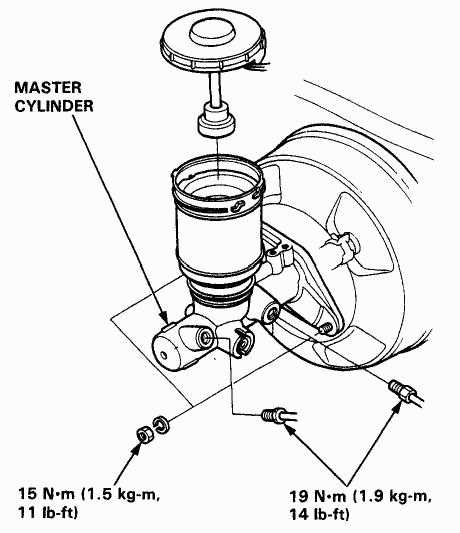
Master Cylinder
Replacement
CAUTION:
• Be careful not to bend or damage the brake pipes when removing the master cylinder.
• Do not spill brake fluid on the car; it may damage the paint; if brake fluid does contact the paint, wash it off immediately with water.
• To prevent spills, cover the hose joints with rags or shop towels.
• Do not mix different brands of brake fluid as they may not be compatible.
• Do not reuse the drained fluid. Use only clean DOT 3 or 4 brake fluid.
• When connecting the brake pipes, make sure that there is no interference between the brake pipes and other parts.
1. Remove the reservoir cap from the master cylinder.
2. The brake fluid may be sucked out through the top of the master cylinder reservoir.
3. Disconnect the brake pipes from the master cylinder.
4. Remove the master cylinder mounting nuts and the master cylinder from the brake booster.

5. Install the master cylinder in the reverse order of removal.
6. Fill the master cylinder reservoir up and bleed the brake system.
Brake Booster
Tests
Functional Test
1. With the engine stopped, depress the brake pedal several times, then depress the pedal hard and hold that pressure for 15 seconds. If the pedal sinks, the master cylinder, brake line or a brake caliper is faulty.
2. Start the engine with the pedal depressed. If the pedal sinks slightly, the vacuum booster is working. If the pedal height does not vary, the booster or check valve is faulty.
Leak Test
1. Depress the brake pedal with the engine running, then stop the engine. If the pedal height does not vary while depressed for 30 seconds, the vacuum booster is OK. If the pedal rises, the booster is faulty.
CAUTION: Do not try to disassemble the booster. Replace the booster assembly with a new one.
2. With the engine stopped, depress the brake pedal several times using normal pressure. When the pedal is first depressed, it should be low. On consecutive applications, pedal height should gradually rise. If the pedal position does not vary, check the booster check valve.
Check Valve Test
1. Disconnect the brake booster vacuum hose at the booster.
2. Start the engine and let it idle. There should be vacuum available. If no vacuum is available, the check valve is not working correctly. Replace the check valve and retest.

О компании
Каталоги
Каталоги авто
Наши телефоны:
Наши реквизиты:
Политика конфиденциальности
2024, HondaWorld.
Все права защищены
Наши реквизиты:
ООО "ПартсРу"
ИНН 7713747944, КПП 774301001
ОГРН 1127746372401
ИНН 7713747944, КПП 774301001
ОГРН 1127746372401
Политика конфиденциальности
2024, HondaWorld.
Все права защищены


