Front Caliper
Disassembly
3. On cars with ABS, remove the pad spring from the caliper body.
4. If necessary, apply compressed air to the caliper fluid inlet to get the piston out. Place a shop rag or wooden block as shown to cushion the piston when it is expelled.
Use low pressure air in short spurts. Remove the piston from the caliper.
AWARNING
• Do not place your fingers in front of the piston.
• Do not use high air pressure; use an OSHAapproved 30 PSI nozzle.

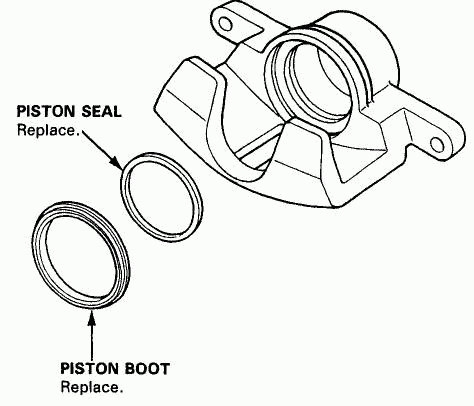
5. Remove the piston boot and piston seal. CAUTION: Take care not to damage the cylinder.
Reassembly
CAUTION:
• Do not spill brake fluid on the car; it may damage the paint; if brake fluid does contact the paint, wash it off immediately with water.
• Before reassembling, check that all parts are free of dust and other foreign particles.
• Replace parts with new ones whenever specified to do so.
• Make sure no dirt or other foreign matter is allowed to contaminate the brake fluid.
• Do not mix different brands of brake fluid as they may not be compatible.
• Do not reuse the drained fluid. Use only clean DOT 3 or 4 brake fluid.
1. Clean the piston and caliper bore with brake fluid and inspect for wear or damage.
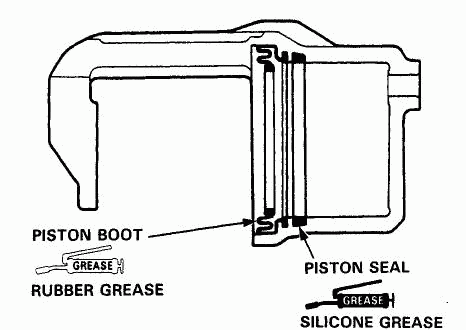
2. Coat a new piston seal with silicone grease and install it in the cylinder groove.
3. Apply Brake cylinder Grease (PIN: 08733-BO20E) or equivalent rubber grease to the sealing lips and inside of a new piston boot, and install the boot in the cylinder groove.
4. Lubricate the caliper cylinder and piston with brake fluid, then install the piston in the cylinder with the dished end facing in.

Принимаем:


Мы в социальных сетях:
Напишите нам:
О компании
Каталоги
Каталоги авто
Наши телефоны:
Наши реквизиты:
Политика конфиденциальности
2024, HondaWorld.
Все права защищены
Наши реквизиты:
ООО "ПартсРу"
ИНН 7713747944, КПП 774301001
ОГРН 1127746372401
ИНН 7713747944, КПП 774301001
ОГРН 1127746372401
Политика конфиденциальности
2024, HondaWorld.
Все права защищены