ВНИМАНИЕ! График работы на майских праздниках: Офис в Москве: 9 мая ВЫХОДНОЙ!
Офис в СПБ: 1 мая, 9 мая - ВЫХОДНОЙ!
Driveshafts
Removal
INSPECTION
Driveshaft Boot
Check the boots on the driveshaft for cracks, damage, leaking grease or loose boot bands. If any damage is found, replace the boot.
Spline Looseness
Turn the driveshaft by hand and make sure the spline and joint are not excessively loose. If damage is found, replace the inboard joint.
Twisted or Cracked
Make sure the driveshaft is not twisted or cracked. Replace if necessary.
1. Raise the car and place safety stands in the proper locations (see Section 1).
2. Remove the front wheels.
3. Drain the transmission oil (see Section 15).
4. Raise the locking tab on the spindle nut and remove it.

5. Remove the damper fork nut and damper pinch bolt.
6. Remove the damper fork.

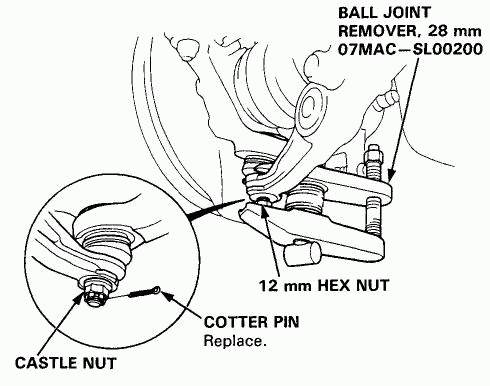
7. Remove the cotter pin from the lower arm ball joint castle nut and remove the nut.
8. Install the 12 mm hex nut on the ball joint. Be sure that the 12 mm hex nut is flush with the ball joint pin end, or the threaded section of the ball joint pin might be damaged by the ball joint remover.
NOTE: Use the Ball Joint Remover, 28 mm, as shown on page 18-11, to separate the ball joint and lower arm.
9. Position the special tool between the knuckle and lower arm as shown, then separate the lower arm.
CAUTION: Be careful not to damage the ball joint boot.
Принимаем:


Мы в социальных сетях:
Напишите нам:
О компании
Каталоги
Каталоги авто
Наши телефоны:
Наши реквизиты:
Политика конфиденциальности
2024, HondaWorld.
Все права защищены
Наши реквизиты:
ООО "ПартсРу"
ИНН 7713747944, КПП 774301001
ОГРН 1127746372401
ИНН 7713747944, КПП 774301001
ОГРН 1127746372401
Политика конфиденциальности
2024, HondaWorld.
Все права защищены