ВНИМАНИЕ! График работы на майских праздниках: Офис в Москве: 9 мая ВЫХОДНОЙ!
Офис в СПБ: 1 мая, 9 мая - ВЫХОДНОЙ!
Regulator Valve Body
Disassembly/Inspection/Reassembly
NOTE:
• Clean all parts thoroughly in solvent or carburetor cleaner and dry with compressed air.
• Blow out all passages.
• Replace valve body as an assembly if any parts are worn or damaged.
• Check all valves for free movement. If any fail to slide freely, see Valve Body Repair on page 14-73.
1 . Hold the regulator spring cap in place while removing the lock bolt. Once the bolt is removed, release the spring cap slowly.
CAUTION: The regulator spring cap can pop out when the lock bolt is removed. 2. Reassembly is in the reverse of the disassembly procedure.
NOTE:
• Coat all parts with ATF.
• Align the hole in the regulator cap with the hole in the valve body, press the spring cap into the body and tighten the lock bolt.
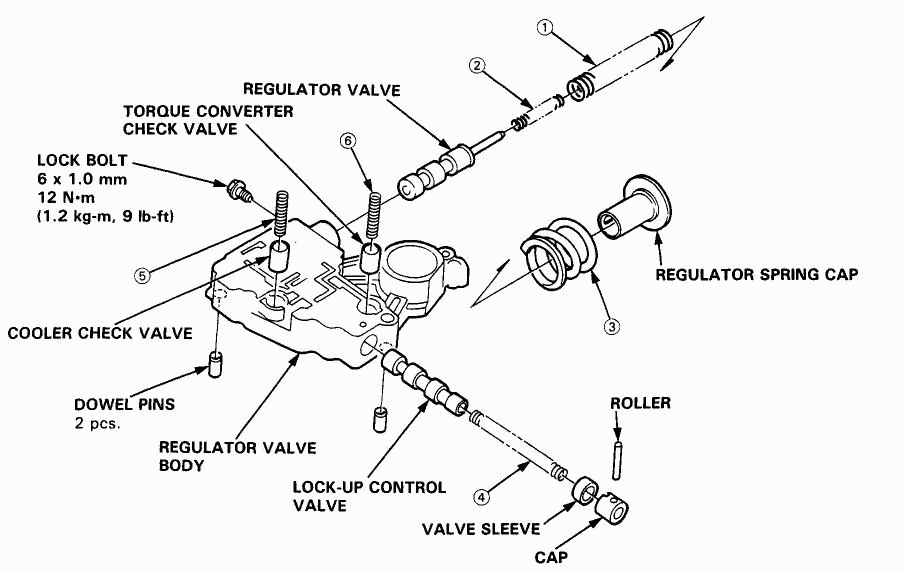
SPRING SPECIFICATIONS
Unit of length: mm (in)
| No. | Spring | Standard (New) | |||||||
| Wire Dia. | O. D. | Free Length | No. of Coils | ||||||
| 1 | Regulator valve spring A | 1.8 (0.071) | 14.7 (0.579) | 88.6 (3.488) | 16.5 | ||||
| 2 | Regulator valve spring B | 1.8 (0.071) | 9.6 (0.378) | 44.0 (1.732) | 7.5 | ||||
| 3 | Stator reaction spring | 5.5 (0.217) | *26.4 (1.039) | 30.3 (1.193) | 2.1 | ||||
| 4 | Lock-up control valve spring | 0.8 (0.031) | 6.6 (0.260) | 50.6 (1.992) | 24.6 | ||||
| 5 | Cooler check valve spring | 1.1 (0.043) | 8.4 (0.331) | 33.8 (1.331) | 12.5 | ||||
| 6 | Torque converter check valve spring | 1.1 (0.043) | 8.4 (0.331) | 33.8 (1.331) | 12.5 | ||||
*: Inside Diameter
Принимаем:


Мы в социальных сетях:
Напишите нам:
О компании
Каталоги
Каталоги авто
Наши телефоны:
Наши реквизиты:
Политика конфиденциальности
2024, HondaWorld.
Все права защищены
Наши реквизиты:
ООО "ПартсРу"
ИНН 7713747944, КПП 774301001
ОГРН 1127746372401
ИНН 7713747944, КПП 774301001
ОГРН 1127746372401
Политика конфиденциальности
2024, HondaWorld.
Все права защищены