Brake Light Switch Test
1. If the brake lights do not go on, check the No. 42 (20 A) fuse in the under-hood fuse/relay box, and the brake light bulbs in the taillight assembly and high mount brake light.
2. If the fuse and bulbs are OK, disconnect the 2-P or 4-P connector from the brake light switch.

3. Check for continuity between the B and C terminals.
There should be continuity with the brake pedal pushed.
• If there is no continuity, replace the switch or adjust pedal height (see Section 19).
• If there is continuity, but the brake lights do not go on, inspect for:
- Poor ground, hatchback: G553, G771, sedan: G554.
- An open in the WHT/GRN or GRN/WHT wire.
High Mount Brake Light Replacement
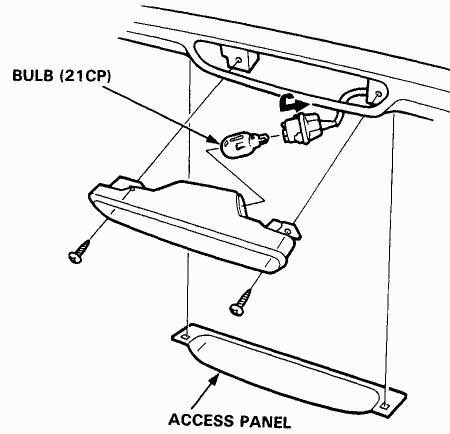
Hatchback:
1. Remove the access panel and 2 screws, then pull out the high mount brake light.

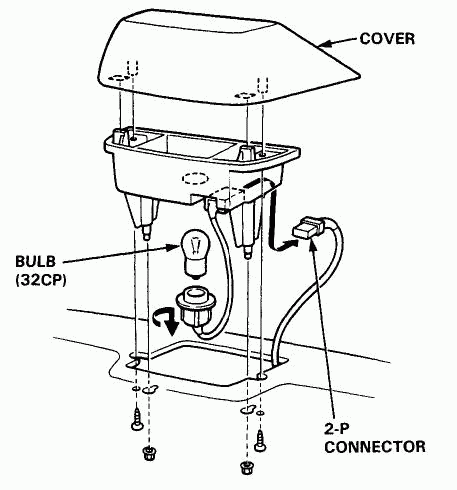
Sedan:
1. Open the trunk lid and disconnect the 2-P connector from the high mount brake light.
2. Remove the 2 screws and 2 nuts, then remove the high mount brake light from the rear shelf.

3. Install the high mount brake light in the reverse order of removal. Clean the rear window glass before installing the light.
О компании
Каталоги
Каталоги авто
Наши телефоны:
Наши реквизиты:
Политика конфиденциальности
2024, HondaWorld.
Все права защищены
Наши реквизиты:
ООО "ПартсРу"
ИНН 7713747944, КПП 774301001
ОГРН 1127746372401
ИНН 7713747944, КПП 774301001
ОГРН 1127746372401
Политика конфиденциальности
2024, HondaWorld.
Все права защищены


